Smart Acoustic Treatment: How To Get The Most Out Of Your New Room And Speakers
I get some version of this email every day:
“I’m about to move to a new room and I want to make sure I get the most out of it. I’ve been researching acoustic treatment, but I’m confused. The room’s got some weird angles and I just don’t know where to start. What’s the right approach for my room?
I definitely know that feeling. You’ve finally gotten your hands on a room you can call your own and turn into a full fledged studio. In your head you’re already designing bass traps and showing the results off to your clients. What colors should you go with? Should you get a new desk as well?
So you go online to do some research and you stumble across all this other stuff. Optimizing room dimensions, tuned bass traps and diffusion, all of which you apparently NEED to get a good sounding room.
You dig a little deeper and before you know it, you’ve gone down this rabbit hole that’s making your brain melt from all the judgment, fighting and different opinions being thrown around.
What started off being such an exciting and fun project suddenly feels completely overwhelming.
You have no idea what works and what doesn’t and you’re left with this uncomfortable underlying fear that whatever you do: It’s wrong!
Believe me, I’ve been there.
And being the weirdo nerd that I am, I just couldn’t let it go. So I tried over and over again until I figured out what DOES work and what DOES matter.
Now I have a framework that I follow with every studio that I treat so I know that I am always getting the most out of my client’s room and giving them the best bang for their buck in the process.
Whenever I enter a room, I know exactly where to start and what issues I need to check first.
I can also easily tailor the solution to my client’s budget and guarantee that we won’t be turning in circles if they want to upgrade later on.
That framework is what I want to show you today.
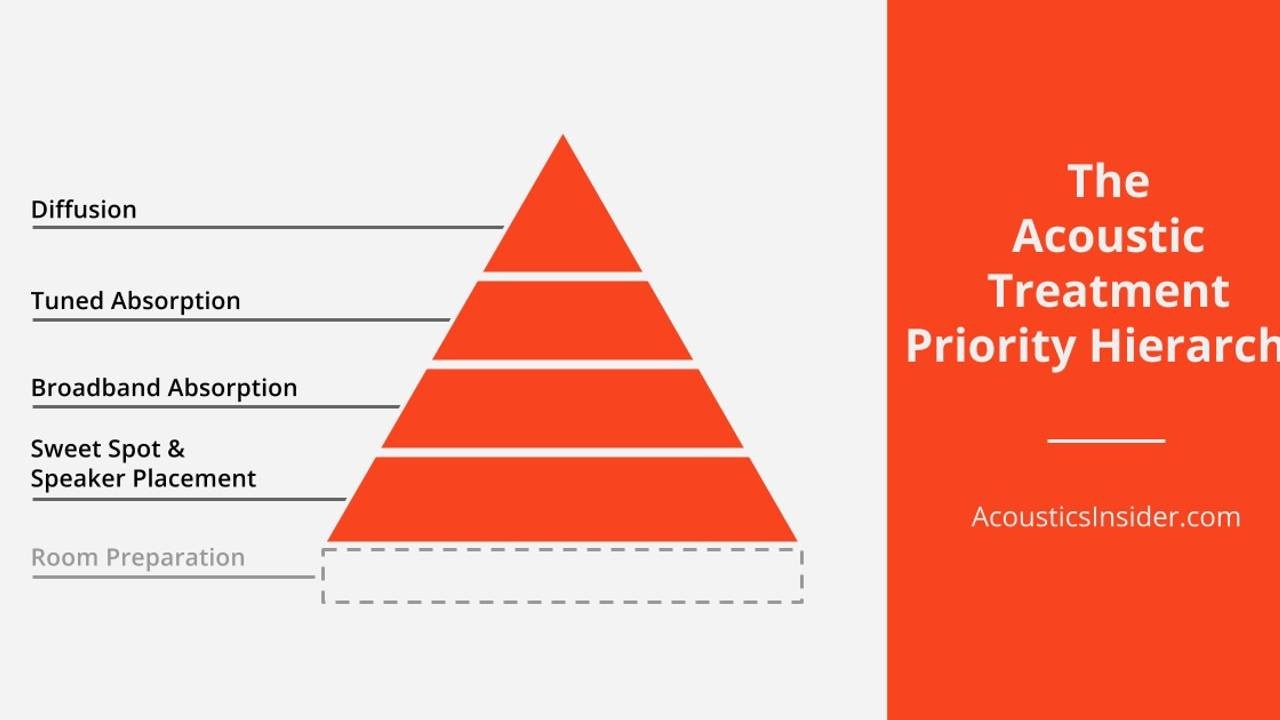
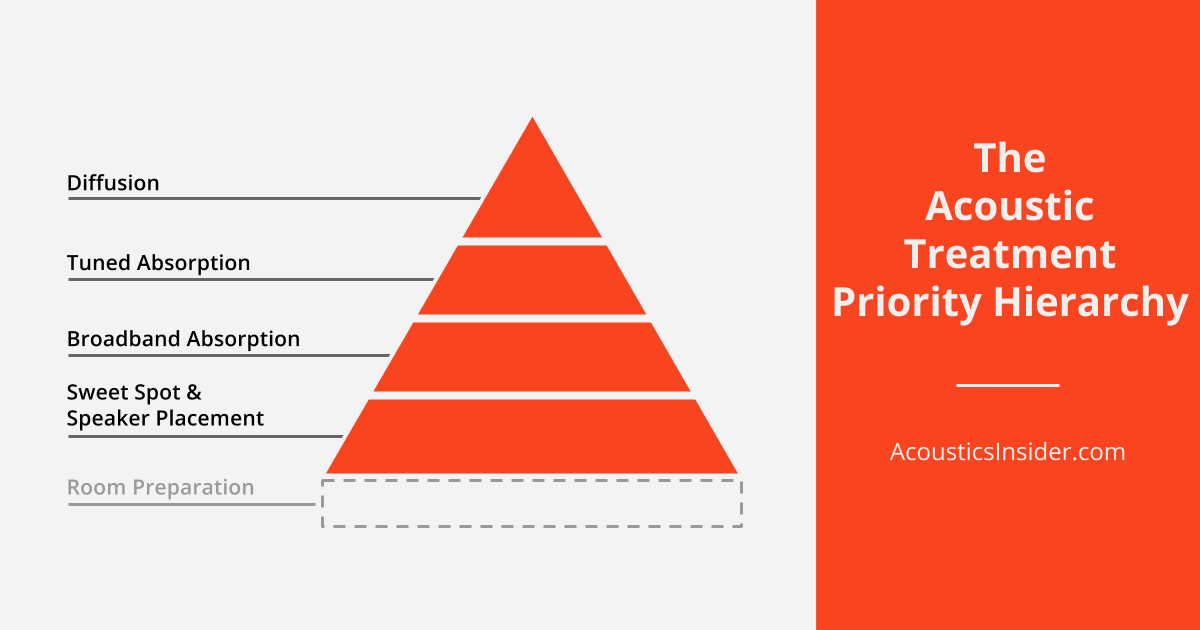
I want to give you my Acoustic Treatment Priority Hierarchy, so you know EXACTLY when to focus your efforts on what, and why.
Think of acoustic treatment like a pyramid.

To get the most out of your room, you want to focus on the big wins first and get the sequence of steps right.
In a way, acoustic treatment is like mixing a record.
Most of the work is in getting a great arrangement and a great volume balance. That’s where the big wins are and what your whole mix builds on.
Instead, if you start by EQing stuff first for example, chances are you’ll end up chasing your tail.
Of course the quality of the source material matters as well, but often times you can’t change what you are given. So more than anything the source material determines how far you can take the mix sound quality wise in comparison to everything else out there.
In a way it defines the upper limit of how far you can go, or how hard it will be to take the sound quality from “good” to “great”.
And that leads me right to the basement of the pyramid.
#-1 The Basement: Room Preparation
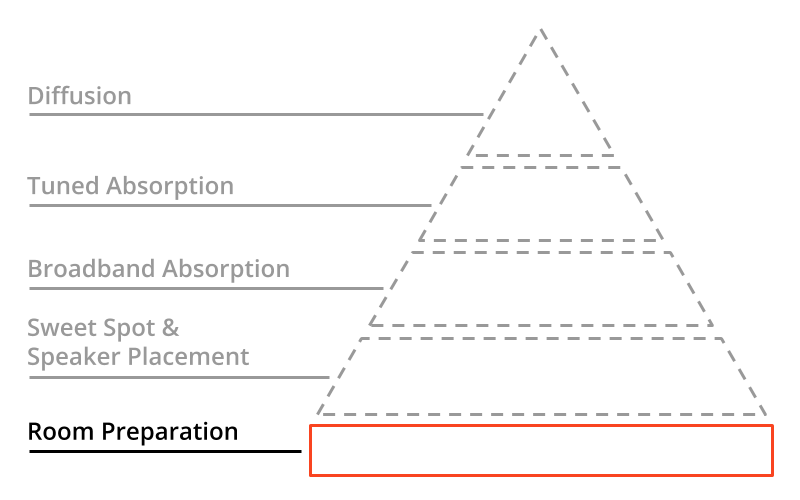
In room acoustics your source material is the room itself in all its naked glory. With its resonating drywall, doors, windows, radiators, pipes and electrical boxes. Every nook and every cranny.
That means it will have some acoustic response particular to that room, that no other room will have. And that’s what you’ll have to deal with. The better you get to know that response, the better you’ll be able to adapt to it and work with it.
Of course, if you are lucky, you can build from the ground up, or at least optimize its shape somehow.
But for most of us that remains a pipe dream and we have to work with what we’re given.
If that’s the case for you, don’t worry, most research (and my own experience) shows that optimized room shapes are highly overrated.
What you can usually do in preparation though, is check any lackluster isolation around the doors and windows, and if anything vibrates or rattles unintentionally.
But generally speaking the room you “are given”, your source material, will simply determine the upper limit of how far you can take your studio sound.
Remember: A good mix with a solid arrangement and volume balance is still a good mix, even if the source material is lacking. And these “good” mixes are played on the radio and hit the charts day in and day out.
So know that good enough is often good enough, and move on.
But if you do have a choice of rooms just remember this one rule: Bigger is better.
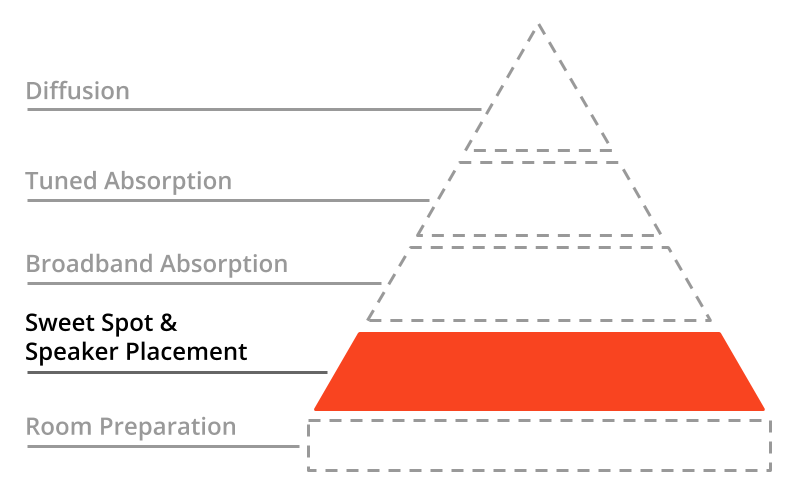
#00 The Foundation: Sweet Spot & Speaker Placement
Ah yes, now it’s starting to get interesting.
If arrangement and balancing is the foundation of a mix, sweet spot and speaker placement is the foundation of a good sounding room.
Not only is any reflection in your room dependent on your listening and speaker position (think of it like playing pool, the cue ball is the speaker and your ear is the pocket), so you’ll need to know exactly where they are if you want to be strategic about placing panels. But nothing has a more direct impact on what you hear.
You can think about it this way:
Your listening position determines the frequency balance in the low end, and your speaker position relative to the listening position determines your stereo image clarity and balance, and presence in the mids and highs.
Just as a little thought experiment: What has a bigger impact on how you hear the music from your speakers?
A 3dB bump at 4kHz?
Or turning one speaker around to face the other way?
So all in all, sweet spot and speaker placement are THE MOST important part to getting your room sounding good.
It’s the first thing you want to do and what you should put the most effort into.
And since it doesn’t cost you a dime, it has by far, the highest value.
If you’ve ever wondered what the least is you can get away with, this is it. And you’ll be perfectly prepped for the moment when you do want to upgrade and get some panels.
Now you might be thinking: “But I’m already facing the short side, sitting at the 38% mark and my speakers are set up in an equilateral triangle, what else can I do?”
Well, a lot actually.
Remember: Your room has a particular acoustic response unlike any other. That means hard and set rules can only get you so far. If you want to get the most out of your room and speakers, you need to get to know YOUR room’s response and adapt to it.
To get you started I’ve prepared a step-by-step guide to walk you through the process. You can get it at the end of this article.
#Tier 1: Broadband Absorption
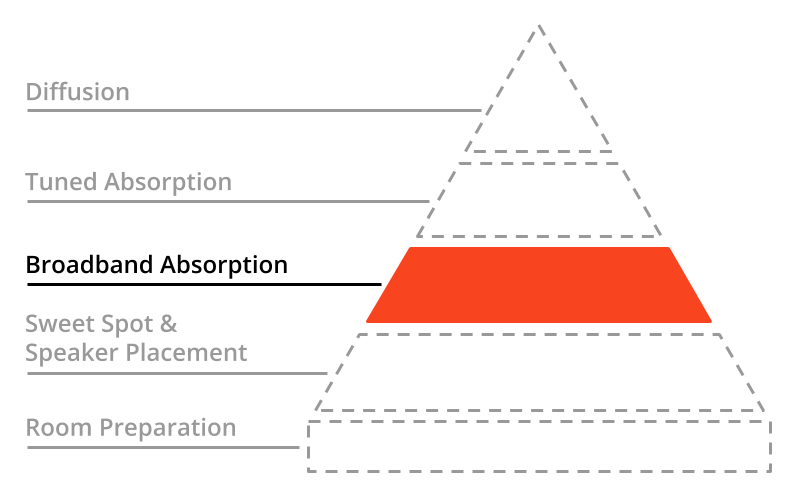
This is your EQ, compression and reverb in the mixing analogy.
Broadband absorbers are great to treat reflection points and as bass traps in corners.
The reason you want to do as much as possible with them first is that they are easy to use, relatively cheap, and work across the entire audible spectrum (if you make them deep enough).
So they help with a range of issues at the same time.
For example: Every broadband panel, no matter where you place it, will also significantly reduce flutter echo.
And most, if not all typical room problems can be solved with broadband absorption.
What’s the 80/20 of acoustic treatment I hear you ask? This is it.
So for most of us, we can call it a day at this point. Our room sounds good enough and we can move on.
#Tier 2: Tuned Absorption
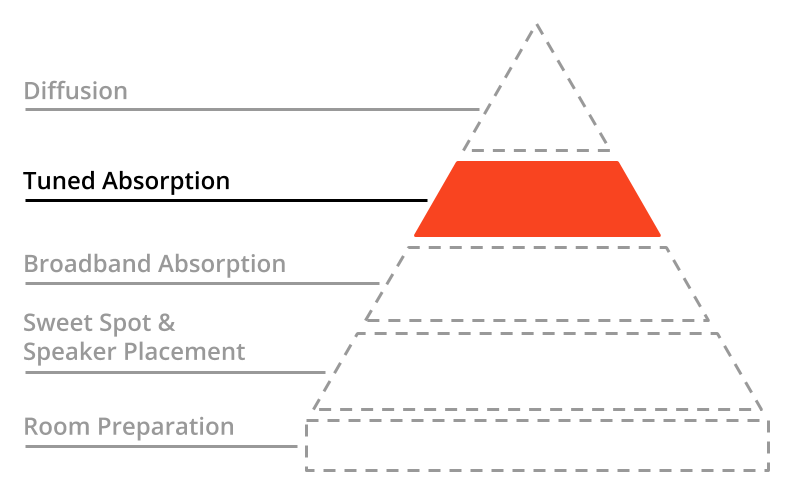
Now sometimes you do find yourself incapable of balancing out a room resonance through careful sweet spot positioning and full-on broadband absorption.
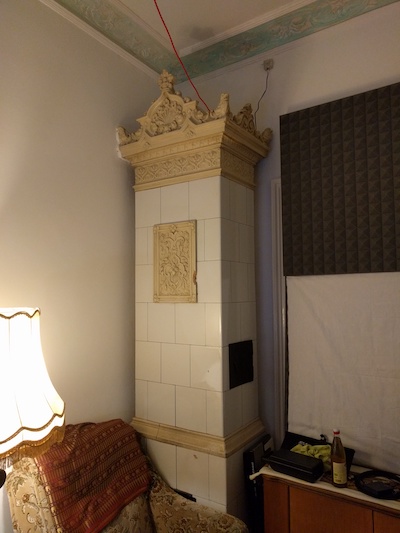
Perhaps a combination of doors and an old stone furnace only makes one side of your room ergonomically available. So you simply can’t escape that spot where those room modes pile up on top of each other.
In this case your source material, your room, is giving you an issue that does need a more targeted approach.
In the mixing analogy, this is a specialized tool, like Izotope spectral repair. You have a particular problem that needs a particular solution.
It’s time. To pull out. That Helmholtz resonator. Yeah baby.
Actually no.
A Helmholtz resonator is like a sniper rifle. You need special training and years of practice to operate the damn thing. For all intent and purpose, it’s completely useless to us.
What you want is a membrane resonator. With the right design, they are relatively simple to use and very effective.
But they are fairly expensive and only really work on one particular frequency (and slightly around it). And since you need around 4 units per problem frequency at the very least, the bang for your buck is pretty limited.
That’s why you really want to get as much as possible out of broadband absorption, BEFORE you turn to any form of tuned absorption. You want to reduce the need for tuned absorption as much as possible.
If you do, chances are you won’t need it at all.
“But Jesco, surely NOW you need to measure to figure out the problem frequency?”
The simple answer is: no. If you have a problem so severe that it needs tuned absorption, believe me, you’ll know exactly what frequency it’s at.
#Tier 3: Diffusion

At this point your room is sounding pretty great.
Your low end is tight and punchy. You can clearly hear the decay of kick drums and when and how the bass locks in the groove. You can effortlessly judge the balance between bass and sub frequencies, and how much you need.
Your stereo image is wide and stable. Your phantom center sounds like there’s speaker in the middle just for that single purpose. The sound stage is deep, balanced and focused.
You can clearly hear small increments in panning, The mids sound present and full, and the highs clear and open.
But you still feel like reaching for headphones when you want to dial in reverb tails.
There’s still that tad bit of smear in your room’s own reverb that affects hearing the really delicate, quite details in your mix.
This calls to fix those last 10%-20%. To break up those last remaining bits of flat wall causing specular reflections and flutter.
In the mixing analogy, this is mix bus compression.
Just to be clear, I’m talking about the typical 1dB gain reduction “sweetening and glue“ type of compression, not the “slap on Soundtoys Devil-Loc in full blast and see if it sounds cool“ type of compression.
For it to work, you want your static mix to be in the ball park first. Otherwise you’ll quickly start chasing your tail.
And if you can’t get a good mix through arrangement and static balance on its own, mix bus compression certainly isn’t going to magically make it good.
It’s the same with your room sound. Diffusion “sweetens and glues” the reverb character of your room to reveal those last quite details in your audio material.
But you need the rest of your room sound to be in check first, or it’s issues will swamp any benefit diffusion brings to the table.
On top of that, most diffusers only work in the mids, so their usefulness to fix problems is limited. Together with the high price that really makes them a pretty bad bang for the buck.
Just like in the mix, it’s arrangement and balance. It always comes down to doing those first.
Now if diffusers just didn’t look so cool…
How To Use The Treatment Priority Hierarchy In Your Existing Room
You’ve seen how the Treatment Priority Hierarchy can tell you how to approach the acoustics treatment of a new room. But it’s equally useful if you are struggling with a problem in your existing space:
Let’s say a bass note really sticks out at your sweet spot and you are wondering if you should get some bass traps to fix it. But you also notice that if you scoot back, the bass evens out.
This is a classic example of simply sitting in the wrong spot. A tuned bass trap would probably help, but you would be working against the acoustic response of your room. It would cost more money and be less effective.
Instead go back to the foundation first:
“Am I really sitting in the best possible position in my room? Have I tested all my options?”
Chances are you are sitting in a spot with an unfavorable balance of room modes.
Even if your room is a small cube (or especially if your room is a small cube), you probably just need to move a little forward or backwards with your listening position to get that resonance fixed. In my experience, this solves 90% of issues in the low end and it’s always the first thing that I do in every room.
The same goes for the opposite: when you’re missing low end at your sweet spot, but you can hear it in other parts of the room.
Once you’ve got that covered, ask yourself:
“Have I exploited every possible corner for broadband bass trapping?”
I guarantee, this will be more effective, cheaper and easier to do than any combination of tuned traps. And no, foam wedges are not bass traps.
Another example:
Maybe you are facing a problem in the low mids. Everything you hear is over-pronounced in the 400Hz to 700Hz area, a glossy cover of the sound.
You are wondering if you should get some more absorber panels behind the speakers in addition to the left and right first reflection points. Or maybe there is something wrong with your speakers and you should get a different pair?
In this case, chances are your speakers are not at the right distance from you and the stereo image isn’t built up right.
So again, go back to the foundation first.
Have you done everything to optimize your speaker’s positions relative to your sweet spot? At what distance are they set up and at what height? How far apart are they? Is the setup perfectly symmetrical? Are you speakers properly decoupled?
Only then does it make sense to invest in more absorber panels.
So as you can tell, this is very different to the typical “You need x, y and z. Don’t forget to measure!” type of advice.
Instead you have a solid framework you can follow so you know when to focus on what and you KNOW that you’ll get the most out of your room and speakers.
Now it’s up to you. Are you prepared to do what it takes?
Since sweet spot and speaker placement are so crucial, but most advice out there just doesn’t cut it, I’ve prepared a special step-by-step guide for you to get you started.
It walks you through a technique that tells you EXACTLY where you need to place your sweet spot and which side of your room you should be facing, no matter what shape or size. It took me years to develop, so you can’t get it anywhere else.
Just leave your name and email below and I’ll send it right over.