Get a great sounding room with a low end you can trust, and finally have that peace of mind when your mixes translate effortlessly.
- Learn how to build your own professional looking bass traps.
- Correctly place your panels using my no-brainer placement hacks.
- Get control down to 40Hz while keeping your room from sounding "dead".
00
DAYS
00
HOURS
00
MINS
00
SECS
What my students are saying...
"Had I had this course ten years ago, it would have saved me weeks or months of research and headache! It is well-founded, understandable and the implementation instructions are foolproof!"
- Joe L.
"I have to say this course has been a great experience for me. Your attention to detail and obvious time spent on this project is invaluable. Just perfect for me. So keep going . We need more of this amazing knowledge sharing."
- John O.
"I was aware of the difference between absorption and diffusion and could identify the pros and cons of both but always felt there was a big consequence for using one or the other. I had never considered combining both absorption and diffusion into one panel. That seems to be a great way to get all the pros without the cons."
- Shane K.
Getting your home studio to translate properly, in particular the low end, is a hard nut to crack.
I’m sure that, if you’ve already got at least a few mixes under your belt, then you’ve realized that your room and speakers are lying to you. What you’re hearing from the speakers isn’t actually the truth of what’s in the music!
I always found it most obvious when you’re mixing late into the night, loving the music, bouncing away in your chair, thinking: “Man this sounds soooo fat!! I think I finally cracked this mixing thing!!”
And then the next day, all excited you put up the track… and… start crying in despair. Nothing sounds the way it should!! Definitely not like last night! The snare is waaay too loud. And the low end… just… gone. What happened?? How could this be??
I think we all know what happened. Bad room acoustics is what happened!
So you naturally go online and start researching room acoustics. But man is there a flood of stuff to go through. In no time at all you get sucked into this vortex of never-ending forum threads with people fighting, following one link to the next, sometimes decades-old obscure websites and blogs, and you only call it quits after 3 hours have passed, your brain is totally numb and let’s face it:
You still have no idea what to do.
In fact, researching the net has only made you more confused.
That’s the main problem with trying to find answers about treating your room online. There is so much misleading information, contradictory opinions, and half-baked advice that it’s impossible to figure out what actually works.
It’s tough to know where to start, and often it leads you to prioritize and try things that don’t give results. It’s really damaging because it makes you seriously doubt that you can make acoustic treatment work for you in the first place.
So you end up in this frustrating limbo of knowing that you “should treat your room” but not knowing how... And maybe you even try something here or there. But every time you gather up the courage to give it another go and finally crack this nut, it ends the same.
More confusion, more questions, and a smoking brain.
So you surrender and go back to the same old routine of accepting the mush in the low end, fighting your way through every new mix, and constantly second-guessing every little decision you make.
The thing is: it absolutely doesn’t have to be this way.
Done right, treating your room is like buying the ultimate piece of gear.
Treating your room won’t do any of the work for you, but it makes everything you do so much easier. You make decisions faster, which in turn means you work faster, and so you learn faster. It’s like a force multiplier. To the point where you don’t even have to “think” about how your mixes will translate anymore.
Your room and speakers instantly tell you everything you need to know.
It literally becomes a matter of: “Oh, this is obviously not right yet, let me make this slight adjustment, ok there we go, done.”
And when you take the mix out to the car or send it off to a client, you know that it will exactly sound how you mixed it.
Can you see how tremendously more impactful this is than any other piece of gear you can buy?
Just imagine. None of that nagging doubt. Just pure flow.
It was no different for me when I got started treating my room.
But I also very early on started helping others to treat their studios. I just couldn’t stop myself going down the rabbit hole again and again.
And again and again, techniques failed, approaches didn’t work and measurements raised a huge question mark. But it also fast tracked my learning curve.
Now 10 years later, with countless studios under my belt, I know that only a handful of techniques and tools actually reliably improve how a small room sounds and more importantly: how mixes translate.
Classic Pareto Principle: 20% of the effort gives 80% of the results.
If you’re working in a small room on a budget and you want results, it all comes down to having the right tool and how you use it in your room.
That's right, you only need one type of panel and the right placement strategy for it.
You need a panel specifically designed to take care of small room issues in one combined package (low-end mush and high-end overdamping), while hitting that sweet spot between cost, size, and looks.
And you need a placement strategy that is tailored to your space, that makes the best use of your panel while focusing specifically on those same small room acoustic problems.
Done right, it won’t just help you get control of your room’s low-end, but will also treat the rest of the spectrum as well.
Imagine how that simplifies things...

Introducing:
Build A Better Bass Trap
&
Absorber Placement Hacks
(for Odd Rooms)
Build your own professional-looking broadband bass trap that works down to 40Hz and keeps your high-end lively. Learn my no-brainer absorber placement hacks and correctly place your panels so it’s no longer a guessing game.

This online program will help you:
- Finally get controlling the low-end and properly treating your home studio off the ground.
- Get that piece of mind about the sound in your room.
- Save weeks to months(!) of painful research on materials and planning.
- Understand the big picture so you can stop obsessing about details that don’t actually matter.
- Cut through all the clutter and get all the relevant information in one place in an easy to understand way.
- Avoid mistakes and headache by having a solid plan in place.
This online program gives you the proven tools and techniques you need to control the bass and acoustically treat your home studio without having to become an acoustics guru. So you can stop thinking about sound, make translation a breeze, and get back to having fun in the studio.
In two highly condensed and easy to follow courses I’ll lay out the exact method I’ve developed specifically to treat small home studios on a budget without skipping a single step.
The complete program is broken down into two main courses:
Build A Better Bass Trap (BBT)
Build your own modular, best bang-for-the-buck bass trap specifically designed to treat small-room low end issues and over-damping.
Absorber Placement Hacks
(APH)
Learn my 6 proven panel placement hacks to quickly lay out a complete treatment plan for your room using the Better Bass Trap or an equivalent off-the-shelf bass trap.
With these two components in place all you have to do is follow the steps to build the panels and mount them to get control over those all-important first 80% of the sound in your room.
It’s literally that simple, whether you’ve just moved to a new room or want to optimize your current room.
If you’re ready to do what it takes - you’ll get the results!
Here’s exactly what you’ll get inside the core video lessons of
Build A Better Bass Trap (BBT)
Module 1 - Why off-the-shelf Acoustics Doesn’t Work
Get a controlled, powerful low end and keep your room from sounding “dead”.
- The reverb time problem: Where all your issues start.
- Fixing that darn low-end.
- Avoiding the dreaded “dead” room: Why typical diffusors won’t save you.
- Off-the-shelf absorbers actually do the exact opposite of what you want (The anything-but-a bass trap).
- The Better Bass Trap: A “shotgun” style combined basstrap-diffusor that works in the low-end, looks good and is easy to build.
Module 2 - How The Better Bass Trap Works
Take out the guesswork, avoid confusion, and save big by focusing on what matters.
- The common misconception about the ¼ wavelength rule.
- Why super dense insulation material isn’t the answer.
- Core depth to the rescue: How deep does a bass trap actually need to be?
- Hit that 40Hz sweet spot: The power of the air gap and why you don’t need a superchunk.
- Binary Amplitude Diffusion: The better diffusor front to keep the room lively.
- Putting it all together: The 6 key design rules that make the “Better Bass Trap”.
Module 3: Planning Your Build, And Getting It Done
“Make it as simple as can be, but not simpler.”
- Jesco's tried & tested design.
- Getting stuck? Plan like a professional carpenter.
- Finding the right materials in your area.
- Getting it done on limited time and a limited budget.
Module 4: Building The Better Bass Trap
Step-by-step instructions to help you work quickly, avoid mistakes, and build a professional-looking absorber panel.
- Tools and construction hacks: Shave off valuable hours on big builds.
- Drill Templates (Drill Jigs).
- Prepare The Absorber Frame.
- Wrap Insulation Material.
- Building The Diffusor Front Panel.
- Building The Open Front Fabric Frame Panel.
- Building The Open Front Wrapped Panel.
"Man, I watched the first three modules last night. Wow! I wish I had this info when I was getting started treating my rooms a couple years ago! I think you presented the theory in such a clear and concise way. Well done! Looking at the topics in Module 4, I'm looking forward to watching the rest!"
- Scott B.
Quick Reference Guides
& Step-by-Step Worksheet
The entire Build A Better Bass Trap online course is available in short, easily digestible videos.
But if you’re right in the middle of things and just want to quickly touch up your knowledge, the first two modules include Quick PDF Reference Guides which condense down the essentials in just a few bullet points and illustrations.
On top of that ‘Module 3: “Planning Your Build, And Getting It Done”’, is designed around a dedicated 7-step worksheet.
This is your main homework - a check list of sorts where I walk you through the exact steps you need to take to find the right materials, design your panel, and plan your build.
If you’ve ever been overwhelmed by building your own panels, got stuck because you were afraid of making a wrong move, or just didn’t get started because you didn’t know how long all of it would take: I’ve got your back. By following this worksheet, you can’t fail.


Full Build-Along Video Construction Guide
Of course in ‘Module 4: Building The Better Bass Trap’ I’ll show you the exact mechanics of actually building your panel. I’ve made sure to show every little detail, step-by-step. So if you want to, you can build your own panel right alongside watching the videos.
Or you can just jump into any single step to get a refresher or figure out the best way to do it.
In any case, each step in the build process is broken down in its own short video to make it super manageable.
I’ll also show you all the tools you need (fewer than you might think!) and what tricks and construction hacks we discovered over the years to make the build process as reliable, quick, and painless as possible.
A Diffusor Front To Keep The Room Lively
To keep the high-end lively in your room and eliminate any chance of overdamping and making it sound “dead”, I’ll show you exactly how to design and build your own Binary Amplitude Diffusor to insert into the front of the panel.
It effectively turns your panel into a combined basstrap-diffusor that gives you detailed control over how lively you want your room to be without causing any new issues.
Because unfortunately, you can't just slap on a random sequence of slats on an absorber and expect it to work...
But don’t worry, no maths needed. I’ve done all the heavy lifting already so it’s as easy as picking a suitable pattern for your particular panel size and available materials.
This alone is worth the cost of the entire program.

"I decided to go with diffusion on the bass traps I have made so far. The rest will be absorbers only. For me it was important to get the illusion of the room being bigger than it actually is. And it works! The ceiling height is only 2m… "
-Helge S.
But that's not it! I’ve also added a whole range of useful extras in the...
Bonus Module
- How many you need and how to use it: the position dictates the function. ($100 value)
- Secure Mounting: Making sure your panels stay on the wall without causing unnecessary damage. ($100 value)
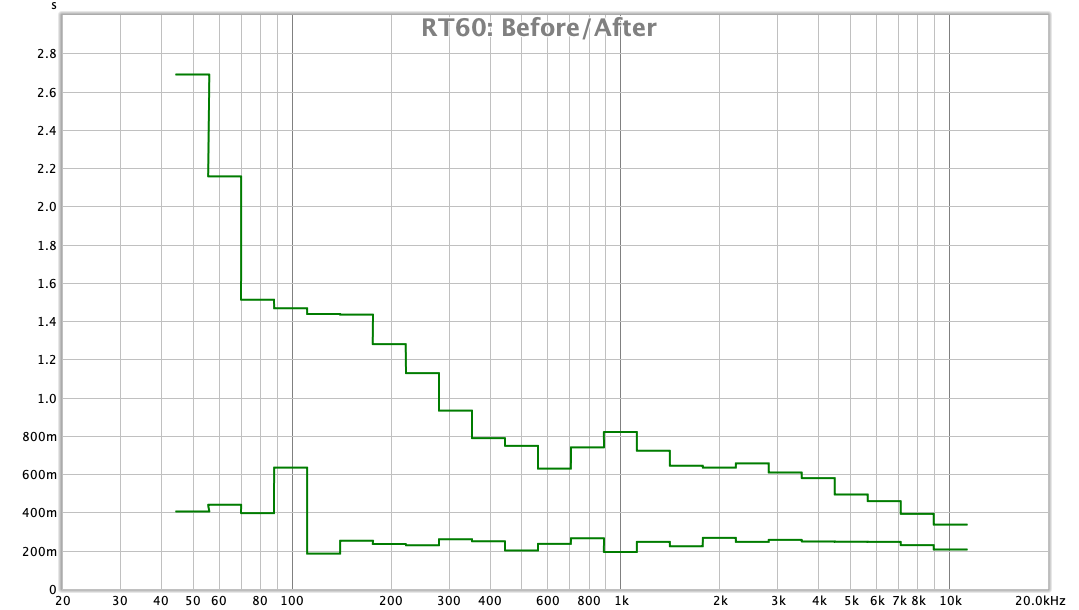
- Before & After Treatment Examples: What results to expect in your room ($100 value)
- My ever-growing material lists to get you started. ($50 value)
- Woodworking fundamentals with my carpenter: How to build confidently if you are new to working with wood. ($50 value)
- Questions and Answers (where I hang out). ($100 value)
Here you’ll find all the important questions answered that you’ll need around the core lessons.
I’ll show you how to figure out how many panels you need to build and how to correctly use the diffusor front in your room.
To make finding the right materials in your area a no-brainer, you’ll get access to my Ever-growing Material Lists.
If you’re new to working with wood and afraid to make a wrong move I’ll walk you through the fundamentals that you need to know to build confidently and make sure your panels end up looking professional.
And I’m including my Mounting Guide, where I’ve collected everything I’ve learned over the years about mounting the panels as safely as possible and keeping any damage to the room to a minimum, Just in case you’re renting the place and need to turn it back into a pristine state when you move out.
Finally you’ll also get access to examples of actual rooms that I treated, with pictures, before & after frequency response and time measurements, and detailed explanations on what it all means, so you can get an idea of what results to expect in your own room.
You won’t find these kinds of deconstructed examples anywhere else.
But if you need more help placing your panels...
...because your room just has a weird shape and placing panels just gets really confusing really quickly, then Absorber Placement Hacks (For Odd Rooms) is for you. I’ll show you the exact method I use to place panels and to quickly lay out a complete treatment plan using the Better Bass Trap.
I developed the techniques in this course specifically to deal with rooms that are little… odd.
So many of us are working from spare rooms in our houses and apartments that were never built for that purpose. And very often, they’re not just perfect square rectangles.
Sometimes it’s just an inconveniently placed door, closet or window that makes our life difficult. But often enough we’re also facing odd corners, angled walls and ceilings, pillars, cubbies, stairs, or even fireplaces… the list goes on.

I once had to deal with this turn-of-the-century tiled wood oven in the corner of the room!
Placing panels in a room like that can quickly get tricky.
Often-times we need to work around the problem. Literally.
But it can be difficult to know which compromise is the right one to make and what consequences it will have on the sound.
It can be even more difficult if you’re trying to integrate that into a larger plan for your room that makes sense and still does what you need it to do!
To show you exactly how to deal with these situations, I developed…
Absorber Placement Hacks
(For Odd Rooms)
How to correctly place acoustic panels and bass traps to maximize low end control and take care of reflections in your home studio, even if your room is slightly "odd".
- How to look at a room, and quickly lay out a treatment plan for a path forward.
- What type of panel (absorption/diffusion) needs to go where, when to use an air gap and how deep it should be.
- How many panels you need, where to start, and how you know when you’re done.
- What spots to focus on first, and what to ignore because it’s just not worth it.
- Real-life, detailed examples on how to deal with all the non-standard, weird parts of a room and the effect this has on the acoustics.
I’ll show you how to place panels correctly when you’re dealing with:
- Odd corners and cubbies
- Closets
- Air ducts
- Attached rooms
- Angled walls and ceilings
- Awkward windows and doors
- Pillars
- Ceiling beams
- Stairs
- And more...
You’ll learn the 6 exact placement hacks I use to reliably take care of standing waves causing peaks and nulls at the listening position, speaker boundary interferences, and all three main types of reflections (yes, there are more than just mirror point reflections).
I’ll show you how to break things down so you can treat as you grow, starting with what’s most important acoustically speaking. I’ll show you exactly where to start your treatment so that you’ll always get the highest sonic impact for each further step you take to implement your treatment plan.
This way you decide how much money and time you’re ready to invest into treatment right now and you’ll always know that you’re getting the best bang-for-your-buck.
And you’re going to do it all using eith the Better Bass Trap that you designed and built yourself, or an equivalent off-the-shelf bass trap.
It doesn’t get any easier, functional, or more modular than that.
I’ve spent years researching, experimenting, and refining to perfect the techniques in this course and make it the absolute best approach out there for treating small home studios on a budget that actually gets results.
Absorber Placement Hacks pulls together my most powerful techniques in an easily digestible, actionable training to help you deal with any odd room problems you may encounter.
Here are the 7 core video lessons in
Absorber Placement Hacks (APH)
Module 1 - Real Talk - How to focus on what matters so you'll actually get it done
- Should you DIY or buy ready made?
- Why placing panels is so confusing (80/20 and when you're done with treatment)
- The one and only acoustic panel you need
- 6 ways to not get lost in the rabbit hole
Module 2 - How to Lay Down A Treatment Plan In 60 Minutes
- Three simple steps to start placing panels like a pro
- 6 Panel Placement Hacks to design your modular treatment plan
- What to do about spots you can't treat (doors, windows etc)
Module 3 - Real-World Treatment Plan Examples

Small, Wide Room with Angled Ceiling
How to deal with:
- Ceiling Beam
- Wall Pillars
- Angled Ceiling

Asymmetric Room with Big Window
How to deal with:
- Big Window
- Angled Wall
- Radiators

Small Room with Side Closet
How to deal with:
- Side Closet
- Door in Corner

L-Shaped Basement with Stairs
How to deal with:
- L-Shaped Room
- Suspended Ceiling
- Stairs

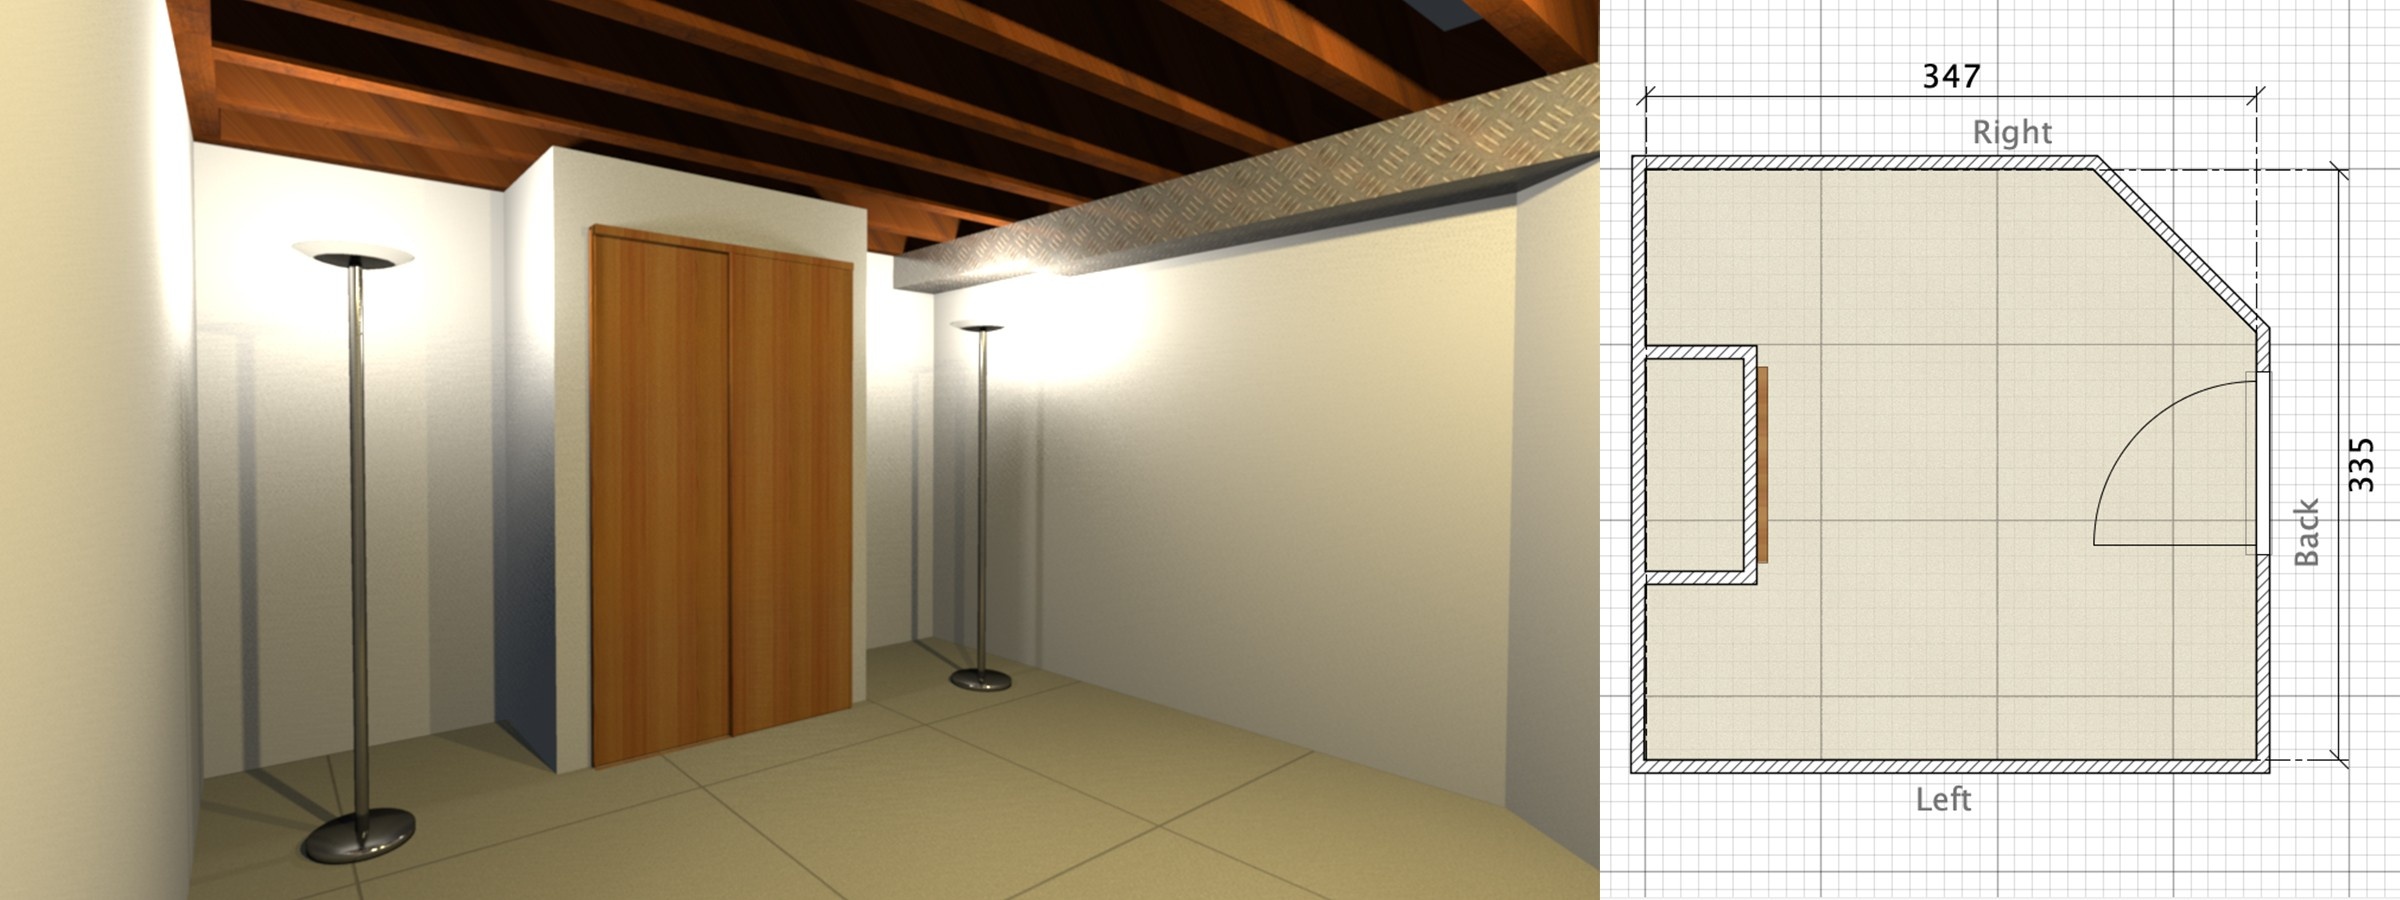
Attic with Front Window
How to deal with:
- Angled Ceiling
- Odd Corners
- Door
Small Basement with Front Closet
How to deal with:
- Closet
- Air Duct
- Odd Corners
- Ceiling Rafters
Using the following real-life example rooms, I'll show you exactly how to put the placement hacks into practice and deal with the oddities of each room.
It's all layed out for you in complete detail. What makes each room special, the effect this has on the sound, and the best way to appraoch it.
Full PDFs to download + Q&A section
Now because it can be hard to constantly reference and scroll through a screen while you plan your room, all the Treatment Plan Examples and the 6 Easy-to-Follow Placement Hacks are there for you to download as PDFs and print out to always have by your side.
Of course there’s also an extensive Questions & Answers section dedicated purely to placing your panels and asking questions about anything that might come up while you plan your own room.

"This is the first time that the explanation of SBIR actually clicked!"
- Andy S.

Bonus - A Custom Treatment Plan Review From Me ($200 value)
Now even if you follow all the step-by-step instructions in the program exactly, it can still be daunting to finally say “go” and get started building. And then nothing is more helpful than getting direct feedback - from me.
So once you've gone through the steps, have designed your own bass trap and planned the placement of all the panels, send me an email with a run-through of what you’ve got and any open questions you have.
I'll send you a custom video response going through it all with you. I’ll give you my feedback to let you know if you're on the right track, if you've missed anything, or if there’s something you can simplify. Once everything is in place, I’ll “sign-off” on your plan so you know that you’re ready to get started.
Bonus - How to plan for a combined mixing and recording room ($100 value)
Of course a lot of us are also recording in the same room that we mix in. Maybe just some vocals, but also guitars, or even drums.
In this bonus lesson I'll show you exactly how to correctly plan the acoustic treatment for a combined mixing and recording room, so you'll get the best of both worlds in your home studio.

"The results are amazing. In the "old" room I already had various absorbers on the ceiling (with a foam core), but now the room has become even better. The stereo panorama has become even clearer and I now hear tracks and sounds in reference songs that I have never heard before. The bass area is also much tidier and clearer."
- Joe L.
You can get the entire
Build A Better Bass Trap & Absorber Placement Hacks
bundle right now for $297.
(+VAT where applicable)
Click here to get instant access.
Get StartedThis program is for you if…
- You’re a busy audio engineer/musician with limited funds working from a small home or project studio.
- You need a clear-cut way to control the bass and treat your room using proven techniques. Think 80/20.
- You’re done wasting time digging through endless confusing blog posts and forums.
- You want the information you actually need, delivered in a simple and digestible way by someone who’s gone down the rabbit hole and come out the other side.
- You enjoy DIYing your acoustic treatment, but you want it to look professional.
This is NOT for you if…
- You're a perfectionist that is totally blind to reality and expects world-class acoustic standards in a tiny room at a fraction of the price. I’m not a wizard.
- You’re a complete beginner to sound and you’ve never heard of standing waves or don’t know the general difference between an absorber and a diffusor.
- You are convinced without a shadow of a doubt that you cannot use porous absorbers for controlling bass.
- You're not ready to dedicate the entire room to being your studio.
“I’ve got a hifi listening room, not a music studio.
Is this still right for me?”
The short answer: probably not.
Here's the thing: this program is built entirely for home studio sound engineers/musicians and their needs.
Now it's true that a lot of the techniques are the same when treating a hifi listening room.
But the priorities and goals are quite different in a listening room. And so is the path to get there. Sound engineers won't have to consider the "wife factor" for example. Or that the room may also be used as a living room. And looks matter, but there is no need to hide anything. The acoustic treatment becomes the look of the room. And it's not subtle.
So the techniques taught in this program will technically also work in a hifi listening room.
But you may find it difficult to apply them because you can't fully sacrifice the space, the look of the room or what else you use it for.
So ask yourself:
- Are you ready to completely dedicate the room to sound and adapt its looks, whatever it takes?
- Are you ready to sacrifice a third (or more) of the room for treatment?
If not, then this program probably isn’t for you.
Also know that however you decide, all the information, explanations, and techniques taught here use professional audio setups as the baseline, so you'll have to adapt everything to your own needs.
I’ve already got some treatment in my room, can I keep using it?
I'm looking to build some tube traps, is that included in your syllabus at all?
I don’t want to put holes into my wall unnecessarily.
What if I move house?
I don't have complete confidence in the actual build of the panels.
Room size: how small is too small?
I’m working out of my actual bedroom, will this work?
Does this program include instructions for acoustic measurements?
Can I get “Absorber Placement Hack (For Odd Rooms)” on its own without the bass trap construction course?
Can’t I just get Sonarworks or other room correction software?
How much are one of these DIY bass traps going to cost in terms of raw materials?
Does this include instructions on how to build (helmhotz/membrane) resonance traps?
Don’t I need to build different types of panels?
“How do I know it’s actually going to work in my room?”
Here are some examples of rooms that I treated following the BBT + APH techniques.
Note that we didn’t even implement the whole treatment plan in any of them because of budget constraints. You could take things even further, just by following the plan! That’s the advantage of Absorber Placement Hacks (For Odd Rooms). You always get the best bang for your buck, no matter what your budget allows.


Here’s the thing.
What I found most frustrating when I first started treating rooms was the sheer amount of unsorted information. The endless jungle of opinions, seemingly inapplicable theory and out of context “just do this” advice without any meaningful explanation whatsoever.
All of it seemed either way too simple, or totally overly complicated.
There was no plan, no structure, no system to bring it all together, nothing to connect the dots.
I didn’t want to just throw some foam up on the wall but I also wasn’t ready to do a full build-out from scratch either.
Why wasn’t there anyone who could just break it down in an easy to follow and understandable way for where I’m at?
Why wasn’t there anyone who just tells it like it is!?
So, I decided to do it myself.
Ultimately, that’s my goal with Acoustics Insider. To tell it like it is. To break it down to the essentials that actually work and to make it understandable and easy to follow.
I want this to be the absolute best material out there for treating home studios.
I want this to be THE go-to solution for busy audio engineers, working from home, who can’t just spend 100k on a room, but are willing to do what it takes with what they’ve got, to put in the work and get results.
If that’s you, then I’m 100% sure that this is the best solution for you out there.

Featured
In:
"Could I find all this material myself?"
Some of it, for sure.
If you're willing to spend weeks and months of digging through endless, brain-numbing pages of forum posts, to buy the right academic textbooks, to find and read the right research papers, and analyze the past 70 years of work by studio acousticians.
But figuring out exactly what works, what doesn't, and what the best bang-for-your-buck is in a small, oddly shaped room takes years of experience and experimentation. That is not something that can be found 'out there' just by looking.
Then condensing all this down into a cohesive, easy to follow strategy takes a whole other level of dedication entirely.
And I’m sure that that’s why you’re here in the first place. Because you don't want to (or have time to) become an acoustics guru yourself. Because you're tired of sifting through confusing, headache-inducing information that doesn't lead anywhere!
You need to know that it works. But you also want to get it done and get back to focusing on music.
That’s exactly how I’ve set this program up for you.
“I don’t have space...”
I totally get it. That’s the number one practical problem that we all face in small rooms. There’s just not enough space!
Look, in the end, it comes down to what your priorities really are.
Is it sound… or something else after all?
I’ve specifically designed this program to give you the highest possible value for money, which includes getting the most out of the available space!
But you’ll have to give up some space. There’s just no way around it.
So if you’re willing to do what it takes, then I’ll show you how to get the most out of your room and speakers while using the least space possible.
And I’ll show you how to implement your treatment in steps, so you can find out for yourself where that ideal compromise of space vs. treatment lies for you personally.
“I don’t have time...”
I've been there. Often you can’t just pull your studio apart and spend weeks tweaking, moving things around, not knowing when you’ll be up and running again.
Especially if you’ve got clients to serve, deadlines to meet, and bills to pay.
It can be hard to know when you’ll have the time to plan the build and get started. You can do it once, but then you want to be set and able to work away. You definitely don’t want to end up making a mistake and having to rip everything out again to start again from scratch.
That’s why the entire program is designed around giving you minimum downtime. I’ll show you how to plan and work smart so you’ll have everything ready to go and know exactly what you need when the day comes to start building and installing panels. Nothing is left to chance.
Look, I'm not going to sugar-coat it. Building panels takes work and time. That's the main thing that'll allow you to save a bunch of money over buying panels ready-made.
But I’ll show you the tricks and hacks we learned over years of building panels that drastically cut down on build time and reduce mistakes.
And I’ll give you a quick way to estimate how long all of it will take so you’ll know exactly what to expect and how much time to plan within a busy schedule.
Hundreds of people have done it before you. I know you can too.
So here’s what you’re getting with the complete Build A Better Bass Trap & Absorber Placement Hacks bundle:
Build A Better Bass Trap (BBT):
- All 42 core videos with over 4 hours of in-depth training and step-by-step guides. ($600 value)
- The BBT bonus module with six additional detailed guides, material lists, and “how-to” trainings to make the entire process a no-brainer.
- How many you need and how to use it: the position dictates the function. ($100)
- Secure Mounting: Making sure your panels stay on the wall without causing unnecessary damage. ($100)
- Before & After Treatment Examples: What results to expect in your room ($100)
- My ever-growing material lists to get you started. ($50)
- Woodworking fundamentals with my carpenter: How to build confidently if you are new to working with wood. ($100)
- Q&A section: To ask your questions and get answers ($100)
Absorber Placement Hacks (APH):
- All 7 core video lessons including simple to follow PDF worksheets. ($500 value)
- Treatment Plan Examples: 6 broken-down, detailed real-world treatment examples. ($500 value)
- Q&A section: To ask your questions and get answers ($100)
- BONUS: A custom treatment plan video review from me where I’ll give you personalized feedback and “sign off” on your plan so you know 100% that you’re ready to get started. ($200 value)
- BONUS: How to plan a combined mixing and recording room. ($100 value)
Total value for this one-of-a-kind program
= $2,550
But right now I’m giving you access to all of this at the amazing price of just $297.
(+VAT where applicable)
Click here to get instant access.
Get StartedOh and btw: it’s completely risk-free
Because I know that the material in this program works if you follow all the steps, I want to make it a complete no-brainer for you to try it for yourself.
So I’m giving you a 60-day 100% money-back guarantee if you buy the program.
Try the course out for yourself, check out all the bonuses, follow the steps, put in the work, and if you don’t think you got your money’s worth within 60 days, just send me an email and I’ll refund you immediately. No questions asked, no hard feelings.
DIYing basically pays for itself…
Yes, it's true. The times where DIYing was A LOT cheaper than buying ready are over...
Still, buying ready-made panels of the quality you’ll learn to build easily cost $200 a pop.
But the material cost of building one panel yourself is only around $80!
So even if you include the price of this program, by building 3 of the panels yourself you’ve already saved money!
$297 + 3x$80 = $537 vs 3x$200 = $600
Just imagine how much money you’re saving if you’re building 10, 20, or even more panels for your room!
And if you bought them ready-made you wouldn’t be getting the Absorber Placement Hacks framework which you can use to treat any and every new room you move into down the line.
Sure, you might also get free placement advice for your current room from the manufacturer, but - let’s face it - they are in the business of selling acoustic panels, not giving treatment advice. And it shows.
Of course you could also hire an acoustician to plan a custom treatment solution for your room.
But a decent acoustician will easily cost hundreds if not thousands of dollars, just for their service and time. And even then, especially at the cheaper end, they’ll often have questionable credentials and work ethics, not to mention a money-back guarantee.
Sometimes they’ll even just say outright: “Your room is too small” and drop you like a hot potato. If you’ve had that happen, you know what it feels like…
It doesn’t have to be this way!
With the Build A Better Bass Trap & Absorber Placement hacks bundle you can save BIG by building yourself, but still get professional advice from someone who’s been deep in the weeds, AND apply it in every new room you move into in the future.
You're seconds away…
Once you log in, you’ll have direct access to my private members area and can start diving into the videos right away.
And of course you get:
- Life-long access
- Any future changes/updates for free
- Watch any time you want and as many times as you like
- Access from any device - your computer, tablet, or phone - as long as you have internet access.

Don’t want my Absorber Placement Hacks?
Now, maybe you don’t want help placing panels in your room or designing a proper treatment plan for whatever reason and just want the basic instructions on how to build the bass trap.
Then you can still get access to all 42 core video lessons in Build A Better Bass Trap including the six additional videos and guides in the bonus section.
But you won’t get the 6 easy-to-follow placement hacks to get those first 80%, the broken down treatment plan examples to help you deal with the odd parts of your room, or my custom video feedback to “sign off” on your room.
Build A Better Bass Trap (BBT):
- All 42 core videos with over 4 hours of in-depth training and step-by-step guides. ($600 value)
- The BBT bonus module with six additional detailed guides, material lists, and “how-to” trainings to make the entire process a no-brainer.
- How many you need and how to use it: the position dictates the function. ($100)
- Secure Mounting: Making sure your panels stay on the wall without causing unnecessary damage. ($100)
- Before & After Treatment Examples: What results to expect in your room ($100)
- My ever-growing material lists to get you started. ($50)
- Woodworking fundamentals with my carpenter: How to build confidently if you are new to working with wood. ($100)
- Q&A section: To ask your questions and get answers ($100)
Absorber Placement Hacks (APH):
- All 7 core video lessons including simple to follow PDF worksheets. ($500 value)
- Treatment Plan Examples: 6 broken-down, detailed real-world treatment examples. ($500 value)
- Q&A section: To ask your questions and get answers ($100)
- BONUS: A custom treatment plan video review from me where I’ll give you personalized feedback and “sign off” on your plan so you know 100% that you’re ready to get started. ($200 value)
- BONUS: How to plan a combined mixing and recording room. ($100 value)
You can get Build A Better Bass Trap on its own for just $197.
(+VAT where applicable)
One more thing I want to say...
If there’s one thing I’ve learned over the years about getting your room to translate and the value that acoustic treatment brings to the table, it’s this:
The earlier you start, the better.
Mix translation is a process that grows with experience and skill. Getting your room treated won’t do that job for you. Instead, the power of acoustic treatment lies in fast-tracking everything you do - and I mean everything.
Your room and speakers are the main, and only, window into your work. Every single decision you make goes through this bottleneck. That’s why every improvement you make here pays off ten-fold down the line.
Not treating your room is like driving a race car with the handbrake on.
How long are you going to keep that up?
How long are you going to continue fighting your room?
Until the next time you end up with a smoking head after hours of digging through endless forum threads? Or the next time you do a “car check” and the low-end in your mix completely disappears?
It doesn’t have to be this way!
But you need to get started so the process of unimpeded mix translation can take its course.
Once you treat your room, the first thing you'll notice is just the sheer detail that you've been missing out on in the music in general. Small things suddenly jump out at you, even in music that you thought you knew like the back of your hand.
Then you’ll realize that the high end somehow sounds cleaner, tighter, less aggressive. Maybe even a little dull.. Until you realize that it was actually distortion from the room that made it sound artificially bright! Now it just sounds… clean. In a really nice way. And you can work for hours without getting tired and numb.
Instinctively, you’ll work more quietly. You just don’t need all that volume anymore.
"One thing surprised me after getting the bass traps in place – I thought I would crank the volume louder, but the opposite happened. The music became more focused and clear, so I didn’t need to turn the knob even more, but actually down a bit. It’s like having a camera with lousy optics and then fit a really good objective which takes in more light, and you don’t have to crank the iso to take the picture, and the picture will be clearer."
- Helge S.
And the low-end! Suddenly it’s no longer just a big mush. You can clearly hear that distinction between the kick and bass, and how they relate and groove together.
Most importantly though, you’ll quickly get a big surprise when your hear how different some of your reference tracks now sound and how HUGE the difference between mixes can be. You’ll realize that often what translates well isn’t even remotely close to what you think “sounds good”.
And then you’re off to the races. THAT’s the key to getting your own mixes to translate.
Eventually, it all becomes second nature. You don’t even “think” about what it sounds like anymore. Your room becomes the ultimate reference point that you know you can trust and can always come back to.
I’m here to show you how you can have that too. Right now.
Join the Build A Better Bass Trap program today and let’s stop the frustration about your room once and for all.
PS: Remember that when you join the program you are joining risk-free.
You have 60 days to go through all the material, to build your own absorber, treat your room, and THEN decide if it’s right for you.
See you on the inside…
Jesco Lohan
